
How to Create an Automated Property Video Tour
An automated property video tour turns listing photos and floor plans into a polished walkthrough with far less manual editing. This guide explains the workflow, tool-selection criteria, best practices, distribution, common mistakes, and ROI.
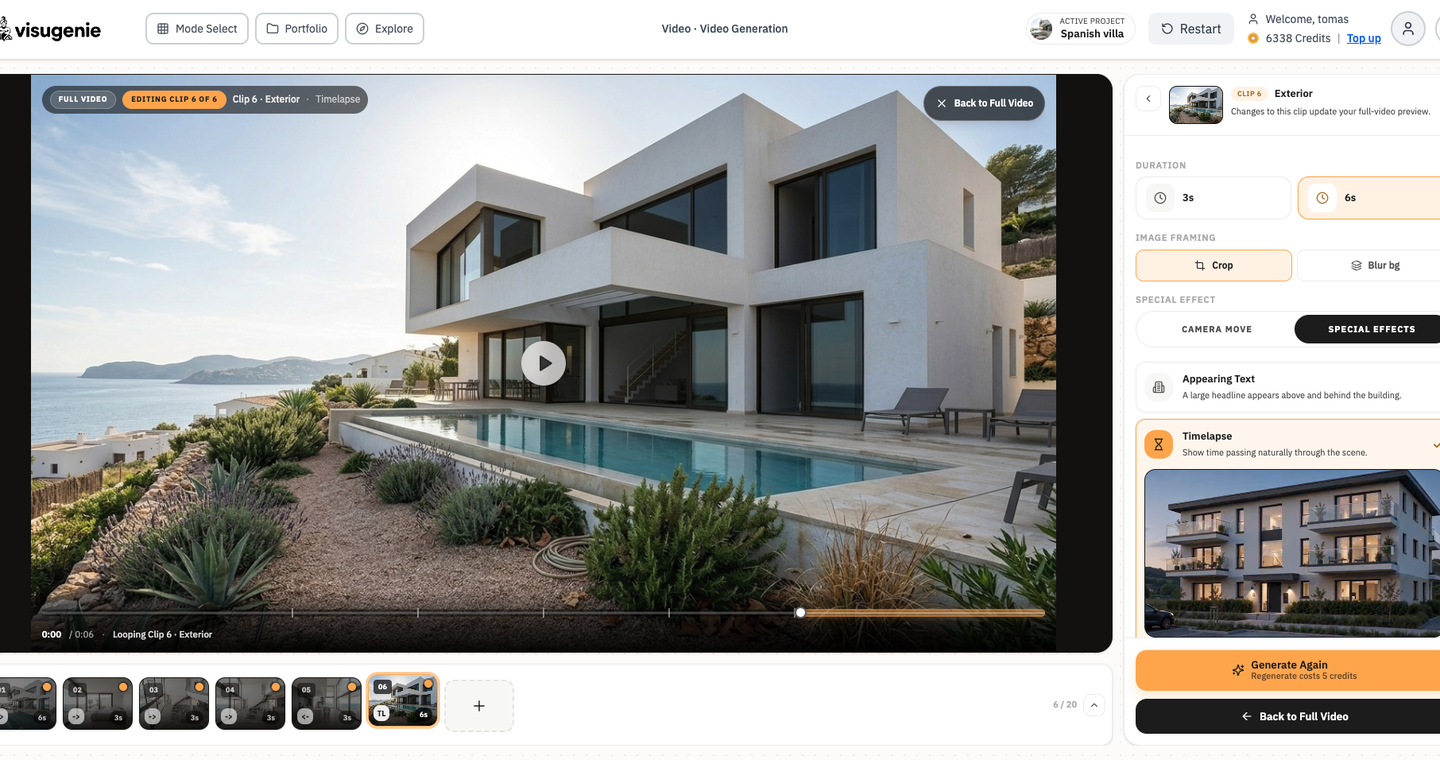
What Is an Automated Property Video Tour?
An automated property video tour is a walkthrough of a listing that is assembled by software rather than by a human editor sitting at a timeline. Instead of shooting footage with a gimbal, importing clips into an editor, cutting between rooms, and manually syncing music and captions, you upload a set of still photos or a short raw clip and the platform handles the rest. The output is a polished, shareable video that moves through the property in a logical sequence, often with pans, zooms, and transitions applied automatically.
The key difference from traditional video production is the removal of the editing bottleneck. A manual tour might take a photographer half a day on site and an editor another three to four hours in post. An automated system can generate a 60-second tour in under five minutes, which is why the format has become a default for agents who list multiple properties every week. The automation does not replace the photography itself; it replaces the repetitive assembly work that follows it.
Modern platforms layer AI property video generation on top of that assembly engine. The AI reads the visual content of each image or clip, identifies rooms and features, and then makes editorial decisions: which shot works best as the opening frame, where to place a slow zoom on a fireplace or a kitchen island, and how to pace the cuts so the video feels guided rather than random. Some tools also generate voiceover scripts or on-screen captions from the listing data, turning a static set of photos into a narrated tour without any manual scripting.
In practice, the finished product looks like a professionally edited listing video: smooth motion, consistent color grading, subtle background music, and a clear room-by-room flow. The difference is that no one sat in front of editing software to make it happen. That is the core promise of an automated property video tour: production quality at a fraction of the time and cost, delivered consistently across every listing in your pipeline.
Why Real Estate Agents Are Switching to Video Automation
Listings with video receive more inquiries than those without, yet traditional production methods demand hours of shooting, editing, and client coordination. Real estate video automation removes that bottleneck by generating a polished automated property video tour from photos and floor plans in under ten minutes. Agents who adopt this workflow cut media turnaround from days to hours while keeping quality consistent across every listing.
| Workflow Step | Manual Production | Automated Video Tour |
|---|---|---|
| Capture | Schedule videographer, shoot 2-4 hours | Upload existing listing photos |
| Editing | 1-2 days, software license required | AI assembles scenes, adds music, captions |
| Delivery | Client review cycles, file transfers | Shareable link ready in minutes |
| Cost per listing | $200-$800 | $0-$50 depending on plan |
Buyer expectations have shifted. Most homeowners say they are more likely to list with an agent who uses video, and most buyers want to see a property tour before scheduling a showing. Agents who rely on manual video simply cannot scale to meet that demand across a growing portfolio. Real estate video automation is not a novelty; it is the new baseline for competitive listing presentations, letting agents reinvest saved hours into client relationships and negotiations.
How Automated Property Video Tours Work: The Core Workflow
An automated property video tour transforms raw listing media into a polished, narrated walkthrough in minutes. The process follows a predictable sequence that most property tour video maker platforms share, even though the underlying AI models differ. Here is the step-by-step workflow, from upload to final export.
- Upload source media. You start with photos, a 360-degree panorama, or a short walkthrough clip. Most tools accept standard formats like JPEG, PNG, MP4, and MOV. Some platforms also pull directly from a listing URL or a Matterport scan.
- Scene detection and ordering. The AI analyzes each image or clip to identify rooms, lighting conditions, and camera angles. It then arranges the scenes in a logical sequence, usually front exterior, entry, living area, kitchen, bedrooms, bathrooms, and rear exterior, matching how buyers naturally explore a home.
- Stitching and stabilization. For video inputs, the system removes shakiness, corrects exposure, and blends transitions between clips. For photo-only inputs, it applies subtle Ken Burns effects (slow zoom and pan) to create motion without requiring actual footage.
- Music selection and mixing. The platform picks a royalty-free track based on the property's style and your brand preferences. It then ducks the music under any narration or ambient audio so the voice remains clear.
- AI narration generation. Using text-to-speech or your own recorded script, the tool generates a voiceover that describes each room, highlights key features, and includes the listing address and price. The narration is synchronized to scene changes automatically.
- Branding and text overlays. Your logo, agent name, phone number, and a call-to-action (e.g. "Schedule a showing") are added as lower-thirds or end cards. Some tools also insert room labels like "Primary Suite" or "Chef's Kitchen."
- Rendering and export. The final automated property video tour is rendered in multiple aspect ratios (16:9 for YouTube, 9:16 for Reels and TikTok, 1:1 for Instagram). You receive a shareable link and downloadable files, ready for MLS, social, and email campaigns.
This entire workflow typically completes in under ten minutes for a standard single-family listing. The real estate video automation layer handles the repetitive editing decisions, so you only review the result and make small tweaks if needed.
Choosing the Right Tool for Auto Generate Real Estate Video
Selecting the right platform for an automated property video tour comes down to four evaluation criteria: ease of use, output quality, customization depth, and pricing transparency. Most agents test two or three tools before committing, but a focused checklist shortens that cycle. Start by asking whether the tool can ingest your existing listing media, including still photos, floor plans, and drone footage, without requiring a manual rebuild. The best options, such as VisuGenie, accept standard file formats and return a draft tour within minutes, not hours.
Output quality is the second filter. Look for smooth transitions, stable motion paths, and natural pacing that mirrors how a buyer's eye moves through a home. A choppy or overly fast automated property video tour can undermine the listing's perceived value, so request a sample render using your own assets before subscribing. Customization matters next: can you reorder scenes, swap background music, add branded intro and outro cards, or adjust the virtual camera's route? The more control you retain after automation, the less post-production work lands on your team.
Pricing should be evaluated on a per-listing basis, not just the monthly sticker price. Some platforms charge per video render, others bundle unlimited tours into a flat subscription, and a few gate higher resolutions behind premium tiers. Calculate your expected monthly listing volume and divide the total cost by the number of tours you will actually publish. A tool that saves 45 minutes per listing pays for itself quickly, even at a higher price point.
| Evaluation Criterion | What to Look For | Red Flags |
|---|---|---|
| Ease of use | Upload photos, auto-generate draft, minimal clicks to publish | Requires manual keyframing or steep learning curve |
| Output quality | Smooth motion, 1080p or 4K export, natural pacing | Jerky transitions, watermarks on paid plans |
| Customization | Reorder scenes, add branding, adjust music and speed | Locked templates with no editing controls |
| Pricing | Transparent per-tour or unlimited monthly plans | Hidden render fees, low-resolution caps on basic tiers |
Finally, check whether the tool integrates with your existing listing workflow. Direct export to your MLS, social media scheduler, or email platform removes a manual step that quietly eats time. A platform that supports auto generate real estate video from a single photo set and returns multiple aspect ratios, including vertical for Instagram Reels and square for Facebook, gives you more distribution options without extra effort.
Best Practices for High-Converting Automated Tours
An automated property video tour only converts when the source material is strong. Start with photo quality: use a wide-angle lens, shoot in HDR, and keep verticals straight. Agents who upload 20 to 30 sharp, well-lit images per listing see longer watch times than those who feed the tool a handful of phone snapshots. The automation handles motion and transitions, but it cannot fix blur, lens distortion, or cluttered countertops.
Room order matters more than most agents expect. A logical flow from curb appeal to entryway, living spaces, kitchen, bedrooms, bathrooms, and outdoor areas mirrors how buyers actually walk a home. If your property tour video maker allows custom sequencing, override the default alphabetical or upload order. Buyers who lose spatial orientation in the first 15 seconds rarely finish the tour.
Lighting is the single biggest differentiator between amateur and professional output. Shoot during golden hour for exteriors, open every blind and turn on every light for interiors, and avoid mixed color temperatures in the same room. Automated tours amplify exposure inconsistencies, so bracketing shots or using a consistent white balance preset pays off immediately.
Captions and on-screen text should reinforce, not repeat, the narration. Use short labels like "Chef's kitchen with quartz counters" or "Primary suite: east-facing light" rather than generic room names. This is where agents maintain a professional brand voice even with full automation: set a house style for capitalization, terminology, and tone, then apply it to every listing so the tour feels curated, not generated.
Finally, review the first five seconds of every automated property video tour before publishing. That opening clip is the thumbnail moment on social feeds and portal listings. If the automation picks a garage door or a hallway as the hero frame, manually select a better cover image. Small manual touches at the start and end of the process keep the middle fully automated without sacrificing brand quality.
Integrating Automated Tours into Your Listing Marketing
An automated property video tour earns its keep only when it reaches the right buyers at the right moment. Start with the MLS, where most serious prospects begin their search. Most MLS platforms now accept video links or embedded players, and listings with video receive more views and inquiries than photo-only entries. Upload the tour directly or link to a hosted version, and make sure the thumbnail shows a compelling interior shot rather than a blank exterior.
Social media is the next high-impact channel. Instagram Reels, Facebook posts, and YouTube Shorts all reward short, vertical video, so create a 30- to 60-second cut from your automated tour and post it with a location tag and a clear call to action. Schedule posts for weekday evenings when local buyers scroll most actively. For email campaigns, embed the tour link in listing announcements and open-house invitations. A one-line teaser like "walk through this home in 90 seconds" lifts click-through rates far more than a static photo grid.
Listing portals such as Zillow, Realtor.com, and Redfin also accept video, and some now auto-play tours in search results. Upload the same automated property video tour file to every portal where the listing appears, keeping the title and description consistent so the tour reinforces the property's key selling points. Finally, treat the tour as the centerpiece of a broader marketing funnel: use it to capture leads on a landing page, retarget viewers with follow-up ads, and send the link in direct messages to buyers who have already expressed interest in similar homes. For more on how video fits into your overall listing strategy, see VisuGenie's visual tools.
Common Mistakes to Avoid with Property Video Automation
Even the best automated property video tour platform cannot fix flawed source material. The most frequent error agents make is feeding it low-resolution photos, shaky handheld clips, or poorly lit rooms. Automation amplifies what you give it, so a blurry kitchen becomes a blurry kitchen in the final cut. Before you run any auto generate real estate video workflow, audit every asset at full size and reshoot anything that is soft, dark, or cluttered.
Over-reliance on templates is the second trap. A property tour video maker that applies the same transitions, music, and pacing to every listing will make your portfolio feel generic. Buyers notice when a colonial and a modern loft share identical motion graphics. Use templates as a starting point, then adjust pacing, color grading, and on-screen text to match the property's character and the neighborhood's price point.
Ignoring mobile optimization quietly kills engagement. Most listing views now happen on phones, yet many agents review their automated property video tour only on a desktop monitor. Vertical framing, tiny captions, and slow-loading files all fail on a 6-inch screen. Test every export on two devices, keep file sizes under 20 MB, and ensure captions are legible at thumbnail size.
Skipping human review is the costliest mistake of all. Real estate video automation is fast, but it is not infallible. A mislabeled room, a lingering shot of a cluttered closet, or a music track that clashes with the property's tone can undermine trust in seconds. Always watch the full tour once before publishing, and have a colleague check it for errors you have become blind to.
- Poor source media: Reshoot any photo or clip that is not sharp, well lit, and free of personal clutter.
- Template fatigue: Customize transitions, text, and music for each listing instead of accepting defaults.
- Mobile neglect: Export a phone-optimized version and verify captions and framing on a real device.
- No human review: Watch the complete tour once, then ask a second person to spot-check room labels and pacing.
Measuring the ROI of Automated Property Video Tours
ROI for an automated property video tour starts with four numbers every agent can pull from their listing dashboard: listing views, time on page, inquiry rate, and showing requests. Before launch, record your baseline for a comparable listing without video. After publishing, compare the same metrics at 7, 14, and 30 days. A healthy lift is 2x listing views and a 20 to 30% jump in time on page, because viewers watch the tour instead of bouncing.
Inquiry rate is the metric that matters most. Divide the number of direct inquiries (calls, emails, form fills) by total listing views. Most agents see inquiry rates climb from 1 to 2% to 3 to 5% once an automated tour is embedded. Showing requests are the downstream signal: track how many inquiries convert into scheduled walkthroughs. If your showing request rate rises by even 10%, the tour is paying for itself in saved agent hours.
Simple tracking works without a full analytics stack. Use UTM parameters on the tour link so you can separate traffic from your MLS, email campaigns, and social posts. Most listing platforms already show time on page and click depth; export those numbers weekly. For a broker managing multiple agents, a shared spreadsheet with one row per listing and columns for views, inquiries, and showings takes ten minutes to update and makes the ROI obvious at the portfolio level.
Finally, attach a dollar value to the time saved. If an automated tour replaces two in-person pre-screenings per listing and each screening costs 45 minutes of agent time, that is 1.5 hours returned per property. Multiply by your hourly rate and the number of listings per month, and the tool cost becomes a rounding error. That is the ROI conversation worth having with your broker.
The Future of AI Property Video in Real Estate
The automated property video tour has moved from a novelty to a standard listing asset, and the next wave of innovation is already visible. The most significant shift is toward personalized tours that adapt to each viewer. Instead of a single linear walkthrough, agents can now deliver a tour that reorders rooms based on a buyer's stated priorities, such as showing the kitchen first to a home chef or the home office to a remote worker. This level of customization was unthinkable two years ago, but today's AI models can parse viewer intent from a short questionnaire and render a bespoke sequence in under a minute.
Voice cloning is another trend gaining traction. Real estate teams are experimenting with synthetic narration that matches the listing agent's tone and cadence, so every automated property video tour sounds like a personal introduction rather than a generic voiceover. The technology is still maturing, but early adopters report higher engagement when the narration feels familiar. Combined with virtual staging integration, the result is a tour that shows both the current condition and a furnished vision of the space, toggled by the viewer in real time.
Real-time updates are perhaps the most practical advancement on the horizon. When a price drops, a room is repainted, or new photos are uploaded, the automated property video tour can refresh itself without a manual re-render. This keeps every listing accurate across portals and social channels, which is a growing expectation among buyers who have been burned by outdated media. As these capabilities converge, the automated property video tour will become less of a static asset and more of a living, responsive marketing tool. For a closer look at how AI handles property images, check VisuGenie's visual tools.
How much does an automated property video tour cost?
Most tools charge $20 to $100 per listing, with monthly subscriptions from $50 to $300 for unlimited tours. AI-driven platforms that stitch photos, floor plans, and narration automatically typically fall in the $30 to $80 per tour range, making them cheaper than hiring a professional videographer for every property.
Do automated property video tours look professional enough for luxury listings?
Yes, when you use high-quality source photos and a tool with smooth transitions, branded overlays, and natural-sounding AI voiceovers. The output rivals mid-tier human editing for most listings. For ultra-luxury properties, agents often add a short manual intro clip before the automated sequence to elevate the first impression.
What technical requirements do I need to create an automated property video tour?
You need a smartphone or DSLR for photos, a stable internet connection, and a browser-based platform. No video editing software or hardware is required. Most tools accept standard JPG or PNG files and floor plan images, then render the tour in 1080p or 4K within minutes.
Can I add my own branding and music to an automated property video tour?
Yes. Nearly all platforms let you upload a logo, choose brand colors, and select from licensed music libraries or add your own audio track. You can also insert custom text overlays for price, address, and agent contact details, ensuring the final video matches your brokerage's identity.
How long does it take to generate an automated property video tour?
After uploading photos and listing details, rendering takes 5 to 15 minutes for a standard 60 to 90 second tour. The entire workflow, from photo selection to a shareable link, typically fits within 30 minutes, which is why agents can produce tours for every new listing without delaying the marketing launch.
Sources
- VisuGenie VisuGenie Accessed Aug. 18, 2026
- VisuGenie Video Features VisuGenie Accessed Aug. 18, 2026
- VisuGenie Image Features VisuGenie Accessed Aug. 18, 2026